Difference between revisions of "Regipay"
| Line 1: | Line 1: | ||
| − | ==regipay FAQ== | + | ==regipay user and sender FAQ== |
===How can I create/send regipay documents?=== | ===How can I create/send regipay documents?=== | ||
Revision as of 07:45, 3 July 2019
Contents
- 1 regipay user and sender FAQ
- 1.1 How can I create/send regipay documents?
- 1.2 Do I need to be authenticated to send regipay documents?
- 1.3 I do not see any regipay functionalities in my portal-menu. What do I need to do to be able to send regipay?
- 1.4 Do I need to be regimail member to be able to send regipay messages?
- 1.5 Can I open regipay messages online, too?
- 1.6 I need to use a proxy for internet access, but I can not find fields for?
- 1.7 What kind of PDF documents are your recommendation?
- 1.8 I use the Client-SDK, but I get error 44 (no regipay allowed)?
- 2 Authentication
- 3 Regular Expressions
- 4 Use placeholders in message body
regipay user and sender FAQ
How can I create/send regipay documents?
Today, there are two ways:
- By using the regipay desktop software (standalone, Windows only).
- Using the regify Client-SDK. It can be used for creation of batch processing scripts or your own applications.
Do I need to be authenticated to send regipay documents?
Yes, to use regipay, you need to be authenticated and you need the unlock-code for your individual identity-file. You need to be authenticated at least with authentication-level 3. Otherwise you will get error 76 (individual identity-file needed).
Your regify-provider needs to activate this option for you. Please contact the regify-provider support.
Do I need to be regimail member to be able to send regipay messages?
No, you can send regipay even if you are not a regimail member. It depends on the individual settings of your regify-provider.
Can I open regipay messages online, too?
Yes. A regipay message can get opened using the web-portal in the same way like a regimal message (upload rgf file).
I need to use a proxy for internet access, but I can not find fields for?
regipay desktop is able to use a proxy. Enter the proxy data directly on the login dialog (after setup) or later in the configuration dialog.
What kind of PDF documents are your recommendation?
We recommend you to send PDF/A files. This is a standard that guaranties optimal readability even after a long time (archiving). It also ensures that no exotic technology is used that may confuse regibill software.
I use the Client-SDK, but I get error 44 (no regipay allowed)?
Your regify-provider needs to activate this option for you. Please contact the regify-provider support.
Authentication
At first, regify offers optional authentication. If a user signs up, a regify provider does not really know his identity. He only knows that the user is having access to the given email address. If some recipient needs to know for sure, if the sender is really the person he claims to be, the sender must be authenticated. This is a process that regify providers may offer to their customers. Some regify providers are configured to offer authentication actively. That means, the user is not able to start an authentication by himself, but the provider administrator can still do this manually. If you need to become authenticated, please contact your regify provider support.
Authentication is offered in two flavours and several authentication levels. Please step in here to get some more information:
regify authentication information page
For sending regipay and regibill messages, we (regify) want the recipient to be sure about the sender identity. This is for confidentiality and security reasons. Thus, the minimum authentication level for sending regipay messages is level 3 (user or organization level). Every regify provider is able to do user and organization authentication with level 1 and 3 without any further efforts. For higher authentication levels, a regify provider must become certified by regify. If you like to become certified, please contact regify support.
Upon authentication, the authenticated person is getting an unlock-code. This is used to gather the identity-file from the regify provider. This identity-file is normally stored on the senders local machine for further use and managed by the sending application (regibill desktop, regipay desktop or standard regify client). The identity-file is now used for every connection to the regify provider securing the transport of information and ensuring the legitimation of a sending account.
The recipients of regimail, regibill and regipay messages can see the senders identity upon receiving and opening the messages.
Regular Expressions
Find date
^(19|20)\d\d[- /.](0[1-9]|1[012])[- /.](0[1-9]|[12][0-9]|3[01])$
Finds a date in yyyy-mm-dd format from between 1900-01-01 and 2099-12-31, with a choice of four allowed separators.
Find numbers
\b\d{2}-\d{6}\b
search "##-######" where # is a digit (like "12-123456")
\d+\-\d+\/20\d{2}
search "#-#/20##" (like "71-07/2011")
Find values behind words
(?<=Username\:).+
Finds all chars after "Username:".
(?<=Invoice-Nr\.:\s)[0-9]{5}[0-9]*
Finds all numbers with 5 or more digits after "Invoice-Nr.: "
Since regipay 2.1, you can also use groups (terms in parentheses):
name:\s+(.*) with Output \1
Finds all behind "name: ".
(?:Periode|Zeitraum|period):\s+(\d\d)/\d\d/(20\d\d) with Output \1/\2
Will look for Periode: or Zeitraum: followed by one or more spaces and a date like mm/dd/yyyy. From this, it will take month / year for output.
Example: "Periode: 05/23/2019" will output "05/2019".
Find APSAL date
Use this regex to find APSAL date in German, French and English payslips:
[A-ZÄÖÜÁÉÍÓÚÂÊÎÔÛÀÈÌÒÙ]+\s+20\d\d
Use placeholders in message body
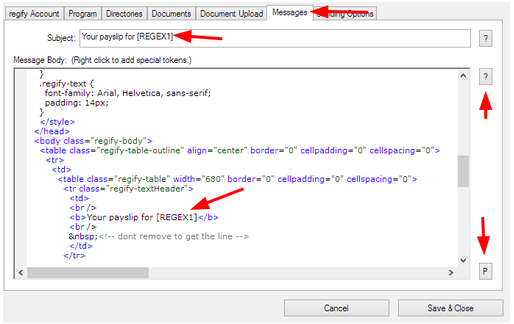
The regipay desktop default templates are using placeholders like [MONTH], [MONTH_NAME] and [YEAR]. But if you are able to use regular expressions to read the payslip date from your payslip, you can use the[REGEXn] placeholders to insert the gathered date from the payslip (which is much better). See the below screenshot for an example:
Please also note the marked [?] buttons (show help about available placeholders) and the [P] button (for preview).
